
A model is a map of a workflow. Just like you can navigate a map in ArcGIS, you can navigate a model using ModelBuilder.模型是工作流的映射。就像你可以在ArcGIS中浏览地图一样,你也可以使用ModelBuilder浏览模型。
Models built in ModelBuilder have built-in directionality. Shape, color, text, and symbols are used in models to communicate information about processes and model status.在模型构建器中构建的模型具有内置的方向性。形状、颜色、文本和符号在模型中用于传达有关流程和模型状态的信息。
Models are invaluable for conducting sophisticated spatial analyses, and can reveal data relationships that spark ideas and collaboration. Also, models are workhorses: If built with reuse in mind, they can be your go-to shortcuts for getting lots of geoprocessing tasks done with less work.模型在进行复杂的空间分析时具有不可估量的价值,它们能够揭示数据之间的关系,从而激发灵感和合作。此外,模型还是得力助手:如果在构建时就考虑到复用性,它们就能成为你的首选捷径,帮助你以更少的工作量完成大量地理处理任务。
If you have never worked with ModelBuilder in ArcGIS Pro, here is a simple five- (or six-) step approach to get you started.如果你从未在ArcGIS Pro中使用过模型构建器,这里有一个简单的五(或六)步方法可以帮助你入门。
1. Plan the Workflow 1. 规划工作流
Before creating a model, know what you want it to do. List the data input, identify the required geoprocessing tools, and describe the desired output. If the workflow is simple, just think it through in your head. For more complicated workflows, you may want to sketch everything on paper or a whiteboard. If you are not sure which tool to use or what a tool’s required inputs are, check the ArcGIS Pro tool reference.在创建模型之前,要明确你希望它实现什么功能。列出数据输入,确定所需的地理处理工具,并描述期望的输出。如果工作流程很简单,只需在脑海中梳理清楚即可。对于更复杂的工作流程,你可能需要在纸上或白板上勾勒出所有内容。如果你不确定使用哪种工具,或者某个工具需要哪些输入,请查阅ArcGIS Pro工具参考。

2. Create the Model Shell 2. 创建模型框架
In ArcGIS, a model must be stored inside a toolbox. In ArcGIS Pro, when you create a new project, a toolbox with the same name as the project is automatically created.在ArcGIS中,模型必须存储在工具箱内。在ArcGIS Pro中,当你创建一个新项目时,会自动创建一个与该项目同名的工具箱。
On the Analysis tab, click ModelBuilder. An empty model window opens.在“分析”选项卡上,单击“模型构建器”。会打开一个空的模型窗口。
Tip: You can also open a new model by right-clicking the toolbox folder in the Catalog pane and choosing New > Model.提示:你也可以通过右键单击“目录”窗格中的工具箱文件夹,然后选择“新建”>“模型”来打开一个新模型。
Now set the model properties by clicking Properties on the ModelBuilder tab.现在通过点击ModelBuilder选项卡上的“属性”来设置模型属性。
In the General tab, enable the option to Store tool with relative path. Relative paths are a good idea, because instead of storing the specific file location of the data on a specific computer, it will save the location of the data in relation to the project. This way, if you move your project later, your model will still work.在“常规”选项卡中,启用“使用相对路径存储工具”选项。相对路径是个不错的主意,因为它不会存储数据在特定计算机上的具体文件位置,而是保存数据相对于项目的位置。这样一来,即使你之后移动了项目,模型仍然可以正常运行。
Set the following properties for the new model:为新模型设置以下属性:
- Name – Type a file name that has no spaces.名称 – 输入一个没有空格的文件名。
- Label – Provide a plain name, which can include spaces.标签 – 提供一个普通名称,可以包含空格。
Click OK. 点击确定。

3. Add Tools and Set Parameters 3. 添加工具并设置参数
With the basic setup done, now comes the fun part. You cannot beat ModelBuilder for easy drag-and-drop building and tinkering. But first, you will need to understand some ModelBuilder vocabulary.基础设置完成后,接下来就是有趣的部分了。在简单的拖放构建和调整方面,没有什么能比得上ModelBuilder。但首先,你需要了解一些ModelBuilder的术语。
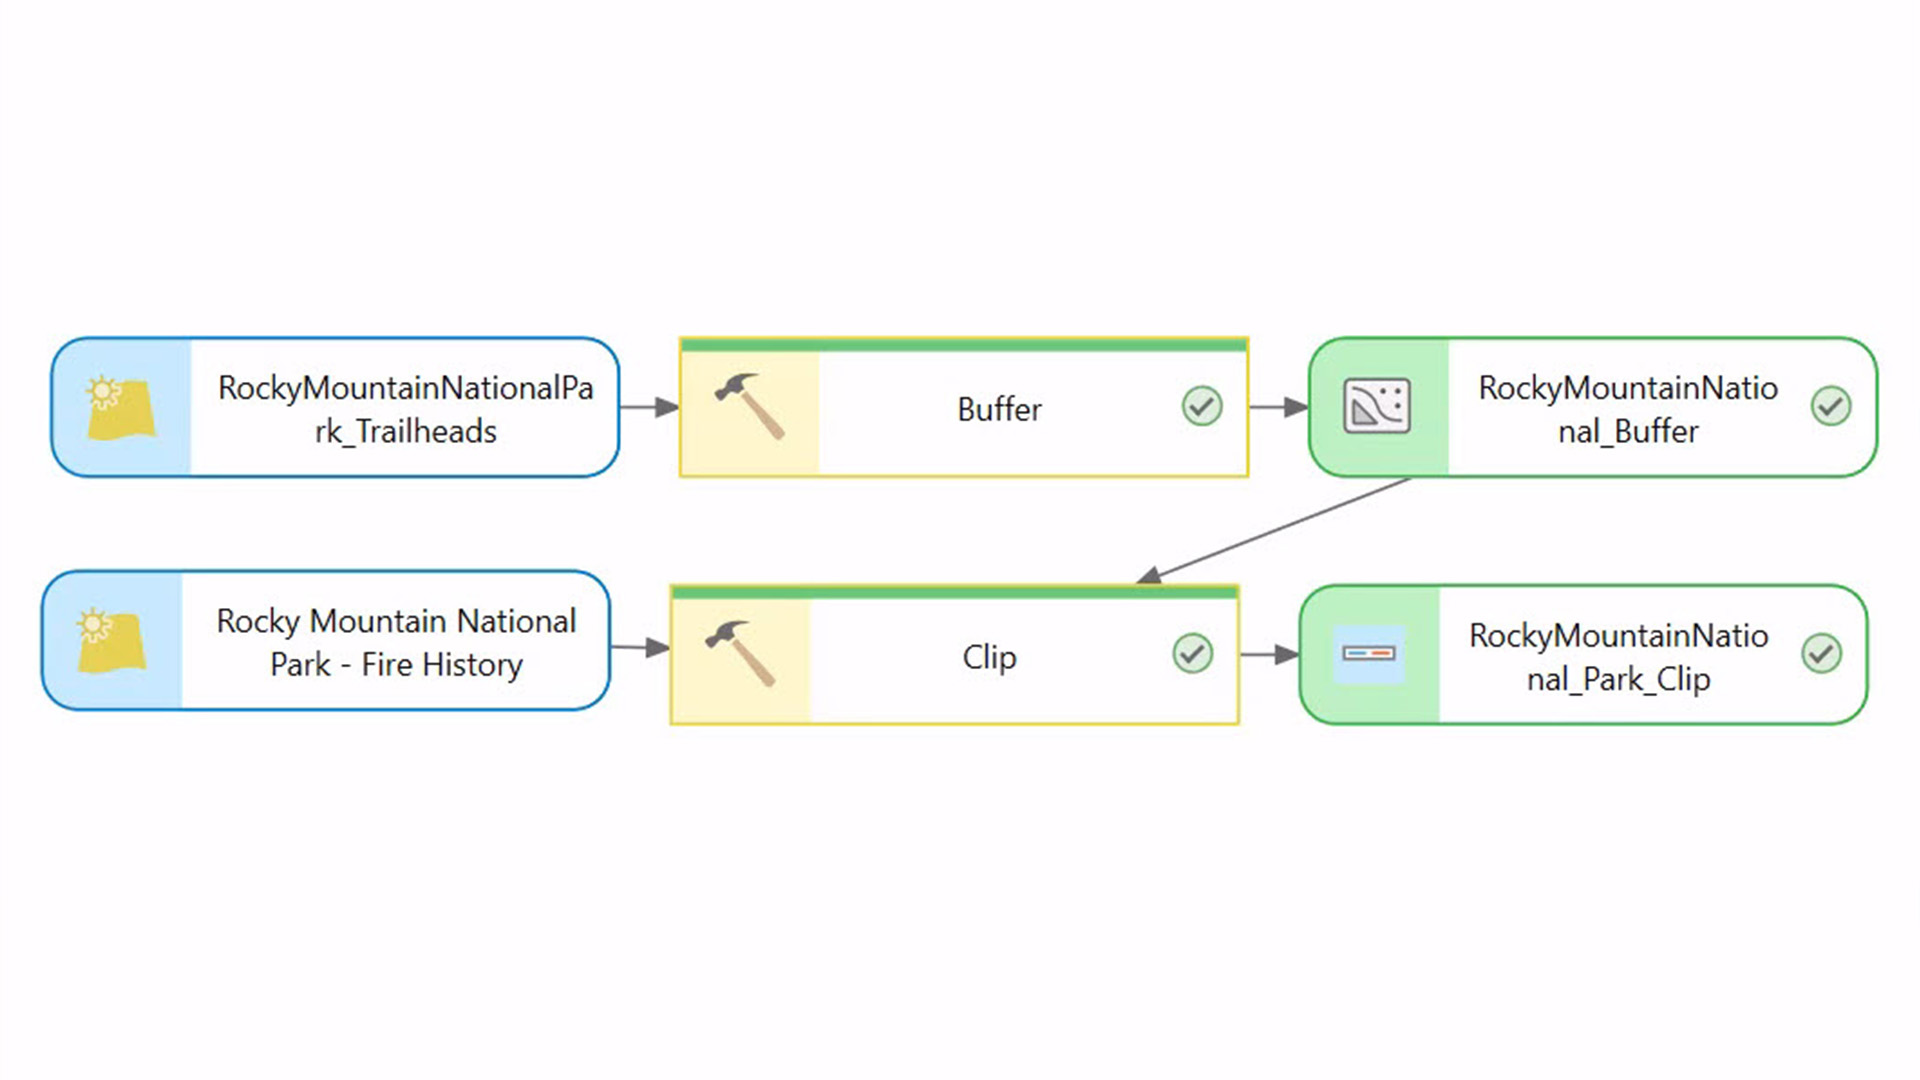
A model consists of one or more processes. A process consists of three elements: input data, a tool, and the tool’s output. Each output can become input for the next process.一个模型由一个或多个流程组成。一个流程包含三个要素:输入数据、工具和工具的输出。每个输出都可以成为下一个流程的输入。
When you add a tool to a model by dragging it from the Catalog or Geoprocessing pane, its output element is also added, and both elements are light gray. In model parlance, gray means not ready to run.当你从“目录”或“地理处理”窗格中拖动工具添加到模型时,其输出元素也会被添加,且这两个元素均为浅灰色。在模型术语中,灰色表示未准备好运行。
Double-click each tool and set its parameters. A red asterisk next to an item in a tool dialog box means the parameter is required. Set tool parameters and pay attention to red asterisks.双击每个工具并设置其参数。工具对话框中项目旁的红色星号表示该参数为必填项。请设置工具参数并留意红色星号。
Tip: If your input data has selected features or records, models like individual ArcGIS geoprocessing tools will process only the selection.提示:如果您的输入数据包含已选择的要素或记录,像单个ArcGIS地理处理工具之类的模型将仅处理所选内容。

Once you click OK to set the tool parameters, the input element displays and the process colorizes.一旦您点击“确定”设置工具参数,输入元素就会显示,且流程会变色。
Now that you have added your first tool to the model, add another, and use the output of the previous tool as input for the new one.既然你已经为模型添加了第一个工具,那就再添加一个,并将前一个工具的输出作为新工具的输入。

As you add processes, the model window may fill up. Use the Auto Layout and Fit to Window buttons to see the big-picture view and zoom in and out as needed.添加流程时,模型窗口可能会被填满。可以使用“自动布局”和“适应窗口”按钮查看全局视图,并根据需要放大或缩小。

Be sure to save periodically as you build the model by clicking Save on the ModelBuilder tab.在构建模型时,务必通过点击“模型构建器”选项卡上的“保存”按钮定期保存。
If you want to visualize the model’s final output on a map, right-click its model element and choose Add To Display. Otherwise, you will have to manually add the output as a layer to the map.如果您想在地图上可视化模型的最终输出,右键单击其模型元素并选择“添加到显示”。否则,您将不得不手动将输出作为图层添加到地图中。
4. Validate the Model 4. 验证模型
After you have added all the tools and set their parameters, it is time to ensure the model will run properly by validating it. Validation is easy—just click the Validate button with the green check mark on the ModelBuilder tab. During validation, if there is an error, processing will cease at the process with the problem.添加所有工具并设置好它们的参数后,就该通过验证来确保模型能够正常运行了。验证很简单——只需点击“模型构建器”选项卡上带有绿色对勾的“验证”按钮。在验证过程中,如果存在错误,处理会在出现问题的流程处停止。
Figure out what is wrong, make the fix, then validate again. Once the model is validated, save the model. Then, save the ArcGIS Pro project.找出问题所在,进行修复,然后再次验证。模型验证通过后,保存模型。接着,保存ArcGIS Pro项目。
5. Run the Model 5. 运行模型
You have two options for running a model: inside or outside ModelBuilder. Run a model inside ModelBuilder by clicking the Run button. As the model progresses, the tool shows a green progress bar. Once the model is run, each tool shows a green status bar and green checkmark. If a process turns gray, that means something needs to be fixed and the model stops running. If you have validated, this should not happen.运行模型有两种选择:在ModelBuilder内部或外部。通过点击“运行”按钮在ModelBuilder内部运行模型。随着模型的运行,该工具会显示绿色的进度条。模型运行后,每个工具都会显示绿色的状态栏和绿色的对勾。如果某个进程变成灰色,说明有需要修复的地方,模型会停止运行。如果已经进行了验证,这种情况就不应该发生。
You can also run the model outside of ModelBuilder by running the model as a tool or service. Running a model as a tool or service has advantages for collaboration and sharing.你也可以通过将模型作为工具或服务运行,在ModelBuilder之外运行该模型。将模型作为工具或服务运行在协作和共享方面具有优势。
6. Run It Again (Optional) 6. 再次运行(可选)
A model’s final output may raise a question. For example, suppose a model process created a 50-meter buffer around a map feature. After examining the model output layer on the map, you wonder what the impact would be if you used a 100-meter buffer instead. To find out, you would simply open the Buffer tool from inside ModelBuilder, enter the new distance value, and run the model again starting at the buffer process (right-click the Buffer tool and choose Run). Because you are not altering preceding processes, you do not need to rerun the entire model. This is the beauty of a model.模型的最终输出可能会引发一个问题。例如,假设一个模型流程在地图要素周围创建了一个50米的缓冲区。在地图上查看模型输出图层后,你可能会想,如果使用100米的缓冲区,会产生什么影响。要找到答案,你只需在模型构建器中打开缓冲区工具,输入新的距离值,然后从缓冲区流程开始重新运行模型(右键单击缓冲区工具并选择“运行”)。由于你没有更改前面的流程,因此无需重新运行整个模型。这就是模型的美妙之处。
Built for reuse, models are a perfect way to explore and test what-if scenarios. Like scripts, models are encapsulated workflows. Once created, they can be used over and over as a fast alternative to manually performing all the individual steps in a workflow. You can build a model to automate any geoprocessing workflow, whether it is complex, or simple and straightforward.模型专为复用而设计,是探索和测试假设情景的理想方式。与脚本类似,模型是封装的工作流。创建完成后,它们可以反复使用,作为手动执行工作流中所有单个步骤的快速替代方案。您可以构建模型来自动化任何地理处理工作流,无论该工作流是复杂的,还是简单直接的。
Now that you have learned the steps to create a simple model, get going and try it for yourself!既然你已经学会了创建简单模型的步骤,那就开始动手自己尝试吧!


没有回复内容